Grilled Corn on the Cob Recipe
At the first sighting of the season’s corn on the cob, I get a little giddy. I love the whole process: gathering the ears by the armful, shucking the husks with the help of daughter, and choosing the best way to cook them: boiled, oven roasted, grilled in the husks. You can even enjoy the kernels raw in a crunchy corn salad!
To enjoy the freshest corn on the cob…
- Feel the kernels at the tip of the cob before you buy them. They should be developed all around the tip. If not, it may be a sign that the ear has not fully matured.
- Look at the silk that sticks out at the top. It should be brown, and the freshest ears will have silk that is still moist and sticky.
- Eat corn on the cob as soon as you can after it has been picked: the corn begins to convert sugar to starch after it has been harvested.
- If you will not be eating the corn the day you get it, store fresh corn in the refrigerator with the husks on.
- If you are boiling the corn, do not add salt to the water– it will toughen the kernels! Instead, add a pinch of sugar or dash of milk to make the corn sweeter.
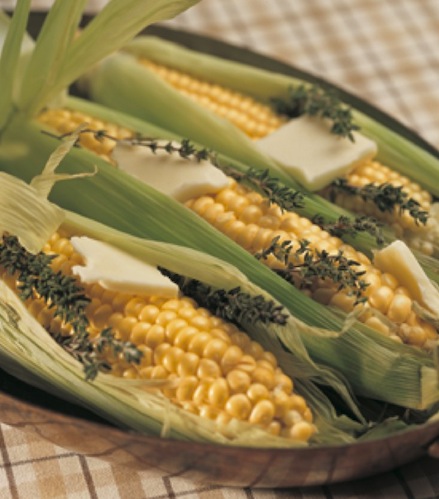
My family loves to grill our corn on the cob and season it with butter and savory herbs. For a simple grilled corn recipe, try my tasty “Thyme for Corn” on the Cob.
What you’ll need…
6 ears with husks Corn
6 tablespoons, cut into slices Butter
Thyme sprigs
Get started…
1. Soak corn in a pot of water for 1 hour.
2. Remove the corn silks by peeling back the husks, being careful not to detach them.
3. Pull the husks back up around the corn. Tuck a few pats of butter, and a couple sprigs of thyme into the husks. Make sure the husks are completely around the corn.
4. Grill corn for about 15 minutes, turning frequently.
Interested in learning how to grow your own corn? Learn from the best source of help and advice for gardeners of all skill levels, Bonnie Plants.




I really enjoy preparing these wonderful recipes for my family